
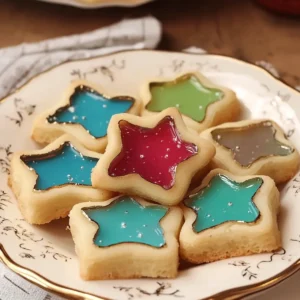
In the midst of a bustling kitchen, I stumbled upon a bright idea that transformed my holiday baking: Stained Glass Cookies. These vibrant treats look like little works of art, with colorful candy filling that turns molten in the oven, creating a stunning stained glass effect. What’s more, they’re simple to make! With a prep time of just 20 minutes and a freezer-friendly option, you can whip up a batch to impress guests—or simply satisfy your sweet cravings. The joy of seeing my loved ones’ faces light up as they bite into these gorgeous cookies is an experience I cherish. Are you ready to elevate your baking game and create these delightful masterpieces?

Why are Stained Glass Cookies so special?
Uniquely beautiful, these cookies can brighten any gathering with their vibrant, candy-filled centers that create mesmerizing stained glass effects. Quick to prepare, you’ll whip up a batch in just 20 minutes, making it an ideal choice even for last-minute plans. Great for all occasions, they’re perfect for holidays, parties, or simply a sweet treat after dinner. Plus, the cheerful colors will excite guests of all ages—just like my favorite Chocolate Chip Cookies but with a creative twist! Enjoy making this stunning dessert that combines simplicity and visual appeal.
Stained Glass Cookies Ingredients
Discover the sweet secrets to crafting these colorful delights!
For the Cookie Dough
- 2 ⅓ cups all-purpose flour – This provides the structure for your Stained Glass Cookies.
- 1 teaspoon baking powder – Helps the cookies rise for a light, fluffy texture.
- ½ teaspoon salt – Balances the sweetness of the cookies beautifully.
- 1 cup softened butter – Ensures a rich flavor and a tender crumb.
- 1 cup granulated sugar – Creates that classic cookie sweetness we all adore.
- 1 large egg – Acts as a binder, giving your dough its cohesive texture.
- 2 teaspoons vanilla extract – Infuses a warm, aromatic flavor that enhances your cookies.
- ½ teaspoon almond extract (optional) – Adds a subtle nutty essence that complements the vanilla.
For the Candy Filling
- Assorted hard candies – Choose vibrant colors to create a stunning stained glass effect in each cookie!
Step‑by‑Step Instructions for Stained Glass Cookies
Step 1: Prepare the Dry Ingredients
In a mixing bowl, whisk together 2 ⅓ cups of all-purpose flour, 1 teaspoon of baking powder, and ½ teaspoon of salt until well combined. This mixture will create a light base for your Stained Glass Cookies. Set aside the bowl as you move on to the wet ingredients, ensuring everything is measured accurately for best results.
Step 2: Cream the Butter and Sugar
In a separate large mixing bowl, cream together 1 cup of softened butter and 1 cup of granulated sugar using an electric mixer. Beat on medium-high speed for about 3-5 minutes until the mixture becomes light and fluffy. This step adds volume and a rich flavor to your cookies, laying the essential foundation for the dough.
Step 3: Incorporate Eggs and Extracts
Add 1 large egg, 2 teaspoons of vanilla extract, and ½ teaspoon of almond extract (if using) to the creamed butter and sugar mixture. Mix on low speed until fully incorporated, scraping down the sides of the bowl as needed. This flavorful blend enhances your Stained Glass Cookies, making them irresistibly delicious.
Step 4: Combine Dry and Wet Ingredients
Gradually add the flour mixture to the wet ingredients, mixing on low speed until just combined. Be careful not to over-mix the dough, as you want your Stained Glass Cookies to remain tender. Once the dough forms, it should be slightly sticky but cohesive, ready for chilling.
Step 5: Chill the Dough
Divide the cookie dough in half and shape each half into a disc. Wrap each disc tightly in plastic wrap and refrigerate for at least 1 hour, or until firm. Chilling the dough helps the Stained Glass Cookies maintain their shape during baking and enhances their texture, resulting in a perfect cookie.
Step 6: Preheat and Prepare Baking Sheets
While the dough chills, preheat your oven to 350°F (175°C). Line multiple baking sheets with parchment paper, ensuring a non-stick surface for your cookies. This preparation will get you ready for when you roll out the dough and cut the cookie shapes.
Step 7: Roll and Cut the Dough
On a lightly floured surface, roll out one disc of chilled dough to about ¼ inch thick. Use larger cookie cutters to create your base shapes, and remember to use a smaller cutter to cut out the centers to form the stained glass effect. Repeat with the second disc after the first batch is rolled out.
Step 8: Fill with Candy
Crush assorted hard candies into small pieces, choosing vibrant colors for a colorful stained glass effect. Place the cookie cutouts onto the prepared baking sheets and carefully fill the centers of each cookie with the crushed candies. This will create the eye-catching centerpiece that makes your Stained Glass Cookies truly special.
Step 9: Bake the Cookies
Bake the cookies in the preheated oven for 8-10 minutes, or until the edges are lightly golden. Watch closely as the candies melt to form the beautiful stained glass effect. Once baked, the cookies should look shiny and vibrant, ready for cooling.
Step 10: Cool and Transfer
Allow the Stained Glass Cookies to cool completely on the baking sheets for about 5 minutes before carefully transferring them to a wire rack. This step ensures your cookies retain their shape and that the melted candy becomes manageable. Once completely cooled, they’re ready to be enjoyed.

Make Ahead Options
These Stained Glass Cookies are ideal for meal prep enthusiasts! You can make the cookie dough up to 24 hours in advance, allowing you to simply roll, cut, and bake whenever you're ready. To prepare ahead, follow the first five steps of the recipe, then wrap the dough discs tightly in plastic wrap and refrigerate. This chilling will help maintain the cookies’ shape and texture while enhancing flavor. When you're ready to bake, roll out the dough, cut out the shapes, fill with crushed hard candies, and bake as directed. This way, you'll have stunning, delicious cookies with minimal effort on busy days!
How to Store and Freeze Stained Glass Cookies
Room Temperature: Keep your Stained Glass Cookies in an airtight container at room temperature for up to 3 days. This helps retain their delightful texture and vibrant appearance.
Fridge: For longer freshness, store the cookies in the fridge, where they can last for up to a week. Just make sure they are in a sealed container to avoid moisture.
Freezer: To freeze, wrap the cookies individually in plastic wrap and store them in a freezer-safe bag for up to 3 months. Thaw at room temperature when you're ready to enjoy them!
Reheating: To refresh cookies, briefly warm them in a preheated oven at 300°F (150°C) for about 5 minutes. This will soften them without melting the candy.
Stained Glass Cookies Variations & Substitutions
Ready to make your Stained Glass Cookies even more delightful and personal? Let’s get creative in the kitchen!
-
Gluten-Free: Substitute all-purpose flour with a 1:1 gluten-free blend for a deliciously inclusive treat.
-
Nut-Free: Omit the almond extract or replace it with an extra teaspoon of vanilla extract for a nut-free version that still tastes divine.
-
Colorful Candies: Swap in fruit-flavored hard candies or seasonal colors to match your event theme, creating a festive vibe in each bite.
-
Citrus Zing: Add a teaspoon of lemon zest to the dough for a fresh burst of citrus flavor that beautifully complements the sweetness.
-
Chocolate Variation: Mix in ½ cup of chocolate chips for a delightful chocolaty twist that pairs well with the colorful candy filling.
-
Spicy Kick: Sprinkle some ground cinnamon or nutmeg into the dough for a warm flavor profile that’s perfect for cozy gatherings.
-
Marbled Dough: Divide the dough and mix in food coloring to create two colors. Twist them together to create a marbled effect that’s just as fun to make as it is to eat.
-
Different Shapes: Use unique cookie cutters like hearts or stars to create themed cookies for holidays or special events, adding a personal touch that everyone will love!
These variations allow you to mold the Stained Glass Cookies to fit any occasion or dietary need, just like I did with my beloved Pencil Cookies Fun! Let your creativity shine, because baking is all about connecting and sharing joy.
What to Serve with Stained Glass Cookies?
When it comes to sharing the joy of baking, enhancing your cookie experience with delightful pairings can truly elevate your gatherings.
-
Milk: Offers a classic pairing, cutting through sweetness while enhancing the flavors of the cookie's buttery base.
-
Hot Chocolate: This rich, creamy drink provides a cozy contrast to the vibrant colors and sweetness of the cookies, perfect for chilly days.
-
Fruit Platter: A selection of fresh fruits like strawberries and oranges lends a refreshing burst, balancing the sweetness and adding a pop of color.
-
Cheesecake Squares: Rich and creamy, these bites pair beautifully with the light texture of the Stained Glass Cookies, making every bite a harmonious experience.
Indulging in dessert can be exciting, and these options promise to create a joyful feast for both the eyes and the taste buds. You might even find yourself in a delightful dessert duo dreamland!
-
Herbal Tea: A calming herbal tea, such as chamomile or mint, offers a soothing counterpoint to the vibrant cookies, making each moment of savoring special.
-
Ice Cream Sundae: Build a fun sundae with scoops of vanilla ice cream topped with crushed Stained Glass Cookies for an elegant yet playful dessert experience.
Expert Tips for Stained Glass Cookies
• Chill the Dough: Make sure to chill the dough for at least 1 hour. This step helps the cookies maintain their shape and texture during baking.
• Candy Selection: Use vibrant, hard candies for the best stained glass effect. Avoid chewy candies, as they won’t melt properly.
• Watch the Bake Time: Keep a close eye while baking. The cookies should be lightly golden, but they can go from perfect to overbaked quickly!
• Cut Carefully: When cutting out the centers, make sure to use a smaller cookie cutter with enough space for the candy to fill. This ensures a beautiful stained glass look.
• Cooling Patience: Allow the cookies to cool completely on the baking sheet before transferring. This helps prevent breakage and keeps the candy intact, creating lovely Stained Glass Cookies!

Stained Glass Cookies Recipe FAQs
How do I select the right hard candies for Stained Glass Cookies?
Absolutely! When choosing hard candies, go for those with vibrant colors like Jolly Ranchers or Life Savers. Avoid chewy candies, as they won’t melt properly to create the stained glass effect. It’s all about bringing a pop of color, so have fun mixing different hues!
What’s the best way to store Stained Glass Cookies?
You can keep your Stained Glass Cookies in an airtight container at room temperature for up to 3 days. This helps maintain their delightful texture and vibrant appearance. If you need them to last longer, pop them in the fridge, where they can stay fresh for up to a week!
Can I freeze Stained Glass Cookies?
Absolutely! To freeze, wrap each cookie individually in plastic wrap and place them in a freezer-safe bag. They can be stored for up to 3 months. When you’re ready to enjoy them, simply thaw at room temperature for a delightful treat anytime!
What should I do if my cookies spread too much while baking?
If your cookies spread more than you expected while baking, it might be due to the dough being too warm or not chilled long enough. Make sure to chill the dough in the fridge for at least an hour before rolling it out. You can also try briefly placing the cookies in the freezer for 10 minutes before baking; this helps them hold their shape!
Can we make these cookies allergen-friendly?
Very! To make Stained Glass Cookies allergen-friendly, consider using gluten-free flour or a dairy-free butter substitute. Be mindful of the hard candies too—some may contain allergens like gluten or nuts. Always check the labels and choose candies that fit your dietary needs!
How can I refresh the texture of Stained Glass Cookies when they start to harden?
To refresh your cookies, preheat your oven to 300°F (150°C). Place the cookies on a baking sheet and warm them for about 5 minutes. This gentle heat will soften the cookies without melting the candy filling, helping to restore their delightful taste and texture. Enjoy your sweet creations anew!
Stained Glass Cookies: A Sweet Colorful Treat to Brighten Your Day
Equipment
- Mixing bowl
- Electric mixer
- cookie cutters
- Baking Sheets
- parchment paper
- Plastic wrap
- wire rack
Ingredients
For the Cookie Dough
- 2 ⅓ cups all-purpose flour Provides structure for the cookies.
- 1 teaspoon baking powder Helps the cookies rise.
- ½ teaspoon salt Balances the sweetness.
- 1 cup softened butter Ensures a rich flavor.
- 1 cup granulated sugar Creates classic cookie sweetness.
- 1 large egg Acts as a binder.
- 2 teaspoons vanilla extract Infuses warm flavor.
- ½ teaspoon almond extract Optional, adds nutty essence.
For the Candy Filling
- assorted hard candies Choose vibrant colors for a stunning effect.
Instructions
Step‑by‑Step Instructions
- Prepare the Dry Ingredients: Whisk together all-purpose flour, baking powder, and salt in a bowl.
- Cream the Butter and Sugar: In a large bowl, cream together softened butter and granulated sugar for 3-5 minutes until fluffy.
- Incorporate Eggs and Extracts: Add egg, vanilla extract, and almond extract (if using) to the mixture and mix on low speed.
- Combine Dry and Wet Ingredients: Gradually mix in the flour mixture until just combined.
- Chill the Dough: Divide the dough in half, shape into discs, wrap in plastic, and refrigerate for at least 1 hour.
- Preheat and Prepare Baking Sheets: Preheat the oven to 350°F (175°C) and line baking sheets with parchment paper.
- Roll and Cut the Dough: Roll out the dough and cut shapes with larger cookie cutters, then cut out centers with smaller cutters.
- Fill with Candy: Crush hard candies and fill the centers of cutouts on the baking sheets.
- Bake the Cookies: Bake cookies for 8-10 minutes until edges are golden and candies have melted.
- Cool and Transfer: Let cookies cool on baking sheets for 5 minutes before transferring to a wire rack.


Leave a Reply