
Picture returning home after a long day, greeted by the enticing aroma of sizzling chicken and sautéed peppers wafting through the air. That's the magic of my Creamy Chicken Fajita Sliders, a dish that transforms humble ingredients into a comforting feast in just 30 minutes. These sliders are not only a breeze to whip up, perfect for busy weeknights, but they also promise to bring everyone to the table with smiles and satisfied appetites. Smothered in a luscious creamy sauce and topped with fresh cilantro, each bite is a little bite of joy. Ready to impress your family and reignite your passion for home-cooked meals? Let’s dive into the recipe and discover how simple ingredients can create unforgettable moments!
Why are these sliders a must-try?
Simplicity drives this recipe, with only 30 minutes from start to finish—perfect for weeknight dinners. Flavor-packed with spices and a luxe creamy sauce, each slider bursts with savory goodness. Crowd-pleaser appeal ensures friends and family will be asking for seconds! Plus, they’re versatile; serve them as appetizers or a main dish. Looking for more inspiration? Check out my Easy Chicken Recipes for more delicious ideas!
Creamy Chicken Fajita Sliders Ingredients
For the Chicken Mixture
- Chicken strips – a pound of tender chicken ensures juicy sliders.
- Olive oil – just a tablespoon to provide a rich flavor while cooking.
- Salt – one teaspoon enhances the overall taste of the dish.
- Pepper – one teaspoon adds a gentle kick without overpowering.
- Chili powder – one teaspoon offers that classic fajita spice.
- Cumin – one teaspoon contributes warmth and earthiness to the mix.
For the Veggies
- Sliced onions – one cup provides sweetness as they caramelize.
- Sliced bell peppers – one cup adds color and crunch to each bite.
- Minced garlic – two cloves bring aromatic depth to the sauté.
For the Creamy Sauce
- Heavy cream – one cup makes the sauce luxuriously smooth.
- Shredded cheddar cheese – one cup melts beautifully for that cheesy goodness.
For Assembly
- Slider buns – twelve mini buns hold all the flavorful filling perfectly.
- Fresh cilantro – chop some for a vibrant garnish that brightens the sliders.
Let's whip up these Creamy Chicken Fajita Sliders and create a deliciously memorable meal for your family or friends!
Step‑by‑Step Instructions for Creamy Chicken Fajita Sliders
Step 1: Sauté the Chicken
Heat a large skillet over medium-high heat and add 1 tablespoon of olive oil. Season 1 pound of chicken strips with 1 teaspoon each of salt, pepper, chili powder, and cumin. Add the chicken to the skillet and cook for 5-7 minutes, stirring occasionally, until golden brown and cooked through. Once done, remove the chicken from the skillet and set it aside on a plate.
Step 2: Cook the Vegetables
In the same skillet, add 1 cup of sliced onions and 1 cup of sliced bell peppers. Sauté these over medium heat for about 4-5 minutes, stirring frequently, until they start to soften and develop a slight caramelization. Add 2 cloves of minced garlic and cook for an additional minute, just until fragrant, enhancing the aroma of your Creamy Chicken Fajita Sliders.
Step 3: Create the Saucy Base
Lower the heat to a gentle simmer and pour in 1 cup of heavy cream, stirring to combine all the delightful flavors. Let the cream warm through for about 2 minutes, then fold in 1 cup of shredded cheddar cheese. Continue stirring until the cheese melts completely and the sauce becomes smooth and creamy, creating a luscious coating for your chicken.
Step 4: Combine Chicken and Sauce
Return the cooked chicken strips to the skillet, mixing them well with the creamy sauce and sautéed vegetables. Allow this mix to cook together for an additional 2-3 minutes, stirring occasionally, until everything is heated through and well combined. This step is key for infusing the chicken with all the wonderful flavors of your Creamy Chicken Fajita Sliders.
Step 5: Assemble the Sliders
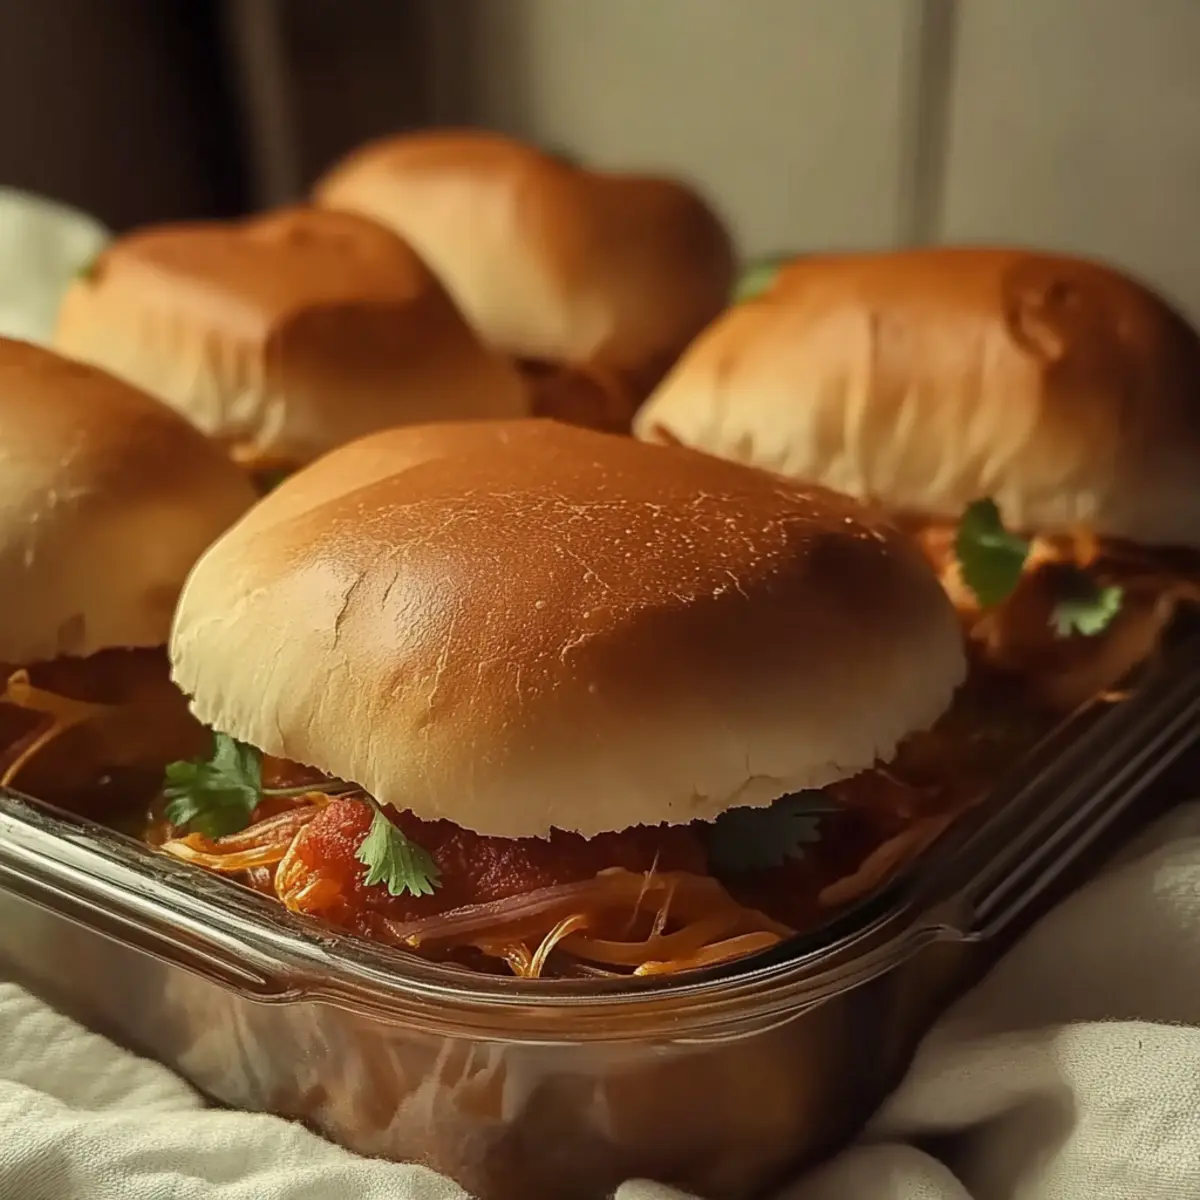
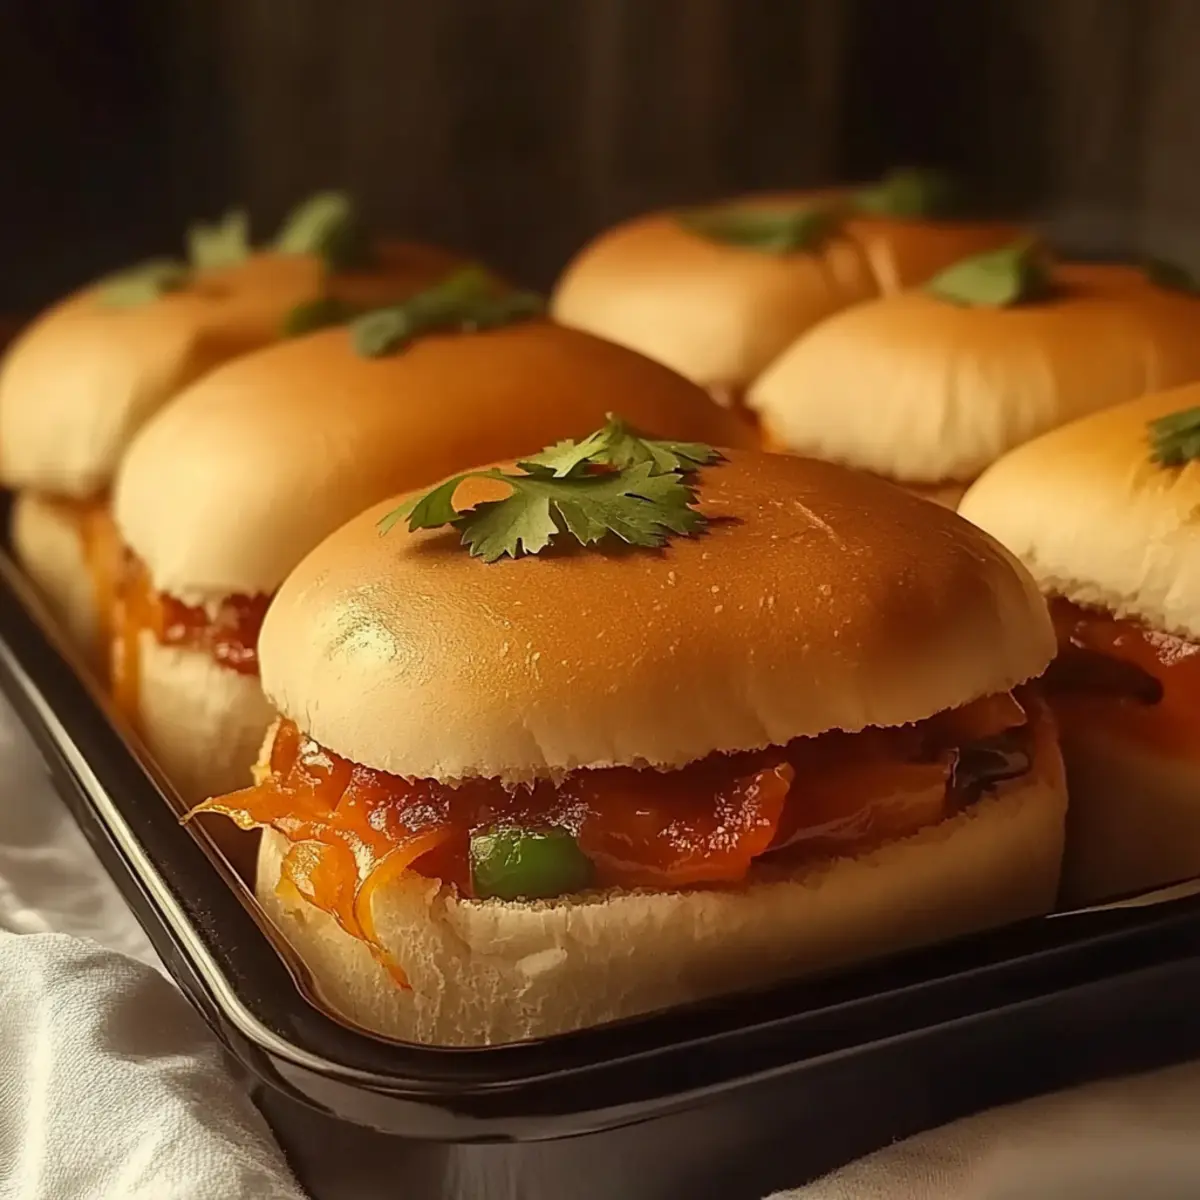
Take 12 slider buns and place a generous spoonful of the chicken mixture on the bottom half of each bun. Top with the other half of the bun, pressing gently to secure the filling. If desired, you can pierce the sliders with toothpicks to keep them together while serving, making for an easy hand-held treat that's perfect for gatherings.
Step 6: Garnish and Serve
Finally, garnish the assembled sliders with freshly chopped cilantro for a vibrant pop of color and added freshness. Serve the Creamy Chicken Fajita Sliders warm, giving everyone a taste of this deliciously comforting meal. Enjoy the delightful smiles around the table as you share this fantastic dish!

Expert Tips for Creamy Chicken Fajita Sliders
-
Optimal Chicken Cooking: Ensure the chicken is in a single layer when cooking. Overcrowding the skillet can lead to uneven cooking and a less crispy exterior.
-
Flavor Adaptation: Feel free to adjust the seasoning! If you prefer a spicier kick, add extra chili powder or fresh jalapeños into the mix for your Creamy Chicken Fajita Sliders.
-
Cheese Choice: While cheddar is classic, try using pepper jack or a blend of cheeses for a delightful twist that adds a new flavor dimension.
-
Vegetable Variations: Customize your vegetables! Try adding zucchini or corn for extra texture and flavor, making each slider uniquely delicious.
-
Slider Bun Tips: Lightly toast your slider buns before assembling to create a barrier against moisture. This keeps them from becoming soggy and enhances their texture.
-
Make Ahead: Prepare the chicken mixture in advance. Store it in the fridge for up to a day, then warm it up before assembly for a quick and easy dinner.
What to Serve with Creamy Chicken Fajita Sliders
Looking for the perfect sides to elevate your slider experience into a feast?
-
Crispy Sweet Potato Fries: These fries offer a delightful crunch and subtle sweetness that balances the creamy richness of the sliders. A perfect companion for dipping!
-
Zesty Mexican Street Corn Salad: This salad’s refreshing flavors and textures harmonize beautifully with the sliders, adding a burst of color and zesty appeal to your meal.
-
Guacamole with Tortilla Chips: Creamy guacamole offers the ultimate contrast to the sliders, while crunchy tortilla chips make for a fun and interactive side!
-
Fresh Fruit Salad: A light and vibrant blend of seasonal fruits adds freshness to your meal, cleansing the palate between bites of savory sliders.
-
Classic Caesar Salad: The crisp romaine, creamy dressing, and crunchy croutons complement the sliders perfectly, adding a Caesar twist to a lively meal!
-
Icy Mint Lemonade: Sipping on a refreshing lemonade, with its zesty lemon notes and cooling mint, rounds off the meal and elevates the dining experience.
-
Chocolate Chip Cookies: Finish off with warm chocolate chip cookies that bring smiles all around, creating a sweet ending to a flavorful dinner. A delightful treat for all ages!
How to Store and Freeze Creamy Chicken Fajita Sliders
Fridge: Store any leftover Creamy Chicken Fajita Sliders in an airtight container for up to 3 days, keeping them fresh and delicious for quick meals.
Freezer: If you want to save some for later, wrap sliders tightly in plastic wrap and place them in a freezer-safe bag. They can be frozen for up to 2 months.
Reheating: To reheat, thaw sliders in the fridge overnight, then warm them in the oven at 350°F until heated through, about 10-15 minutes, ensuring they stay moist and flavorful.
Airtight Tips: Always ensure your sliders are securely wrapped before freezing to prevent freezer burn and maintain their creamy goodness!
Creamy Chicken Fajita Sliders Variations
Ready to make these sliders even more exciting? Let your creativity shine as you explore these fun twists and swaps!
-
Dairy-Free: Use coconut cream and dairy-free cheese to create a luscious, creamy sauce that caters to lactose sensitivities. You'll still experience decadent flavor without compromising comfort!
-
Spicy Kick: Add sliced jalapeños or a dash of hot sauce to the chicken mixture for an extra layer of heat. Feel the warmth rise as you sink your teeth into a spicy bite that ignites your taste buds!
-
Veggie-Packed: Swap out the chicken for black beans or tofu for a hearty vegetarian alternative. Each slider will boast a different texture while still enveloping you in that creamy, savory sauce.
-
Crunchy Toppings: Top your sliders with crushed tortilla chips or fried onions for an unexpected crunch that elevates every bite. It’s a simple addition that brings delightful texture to your team of flavors!
-
Herb-Infused: Sprinkle fresh herbs like cilantro, parsley, or even dill into the creamy sauce for a fresh burst of flavor. Each slider will come alive with the herbal notes, creating a truly gourmet experience at home.
-
Smoky Flavor: Incorporate smoked paprika into the spice mix for a deep, smoky touch. This twist adds a new dimension to your sliders and makes them irresistibly delicious!
-
Bun Alternative: Use lettuce wraps or whole wheat buns instead of slider buns to give your sliders a lighter, healthier feel. Discover how easy it is to enjoy the same beloved flavors with fewer carbs!
-
Sweet and Savory: Add diced pineapple or mango to the sautéed veggies for a surprising sweetness that pairs beautifully with the savory chicken. The balance of flavors will have your family raving about your culinary creativity!
As you explore these variations, remember that each choice enhances the experience of your Creamy Chicken Fajita Sliders and transforms them into something uniquely yours. For more delightful ideas, check out my Easy Chicken Recipes or try your hand at Flavorful Fajita Recipes!
Make Ahead Options
These Creamy Chicken Fajita Sliders are ideal for meal prep, making busy weeknights a breeze! You can sauté the chicken strips, onions, and bell peppers up to 24 hours in advance and refrigerate them in an airtight container. Additionally, prepare the creamy sauce, letting it cool before combining with the chicken mixture. When you’re ready to serve, simply reheat the filling in a skillet over medium heat until warmed through (about 5-7 minutes) and assemble the sliders. This method keeps your ingredients fresh and flavorful, ensuring that your sliders are just as delicious as if you made them on the spot!
Creamy Chicken Fajita Sliders Recipe FAQs
What’s the best way to select ripe ingredients for this recipe?
Absolutely! For the best flavor, choose bell peppers that have smooth, shiny skin without any dark spots. Opt for onions that are firm and heavy with dry, papery skin. If you're using fresh cilantro, select vibrant, green leaves, avoiding any that are wilted or yellowing.
How should I store leftover Creamy Chicken Fajita Sliders?
Store any leftovers in an airtight container in the fridge for up to 3 days. This keeps the flavors intact for quick meals. Just reheat them gently in the oven or microwave before serving, and enjoy the deliciousness once again!
Can I freeze the Creamy Chicken Fajita Sliders?
Certainly! To freeze, wrap each slider tightly in plastic wrap and place them in a freezer-safe bag. They’ll stay fresh for up to 2 months. When you're ready to enjoy, thaw them overnight in the fridge and reheat in the oven for about 10-15 minutes at 350°F, ensuring they stay moist and flavorful.
What should I do if the creamy sauce is too thick?
If your sauce turns out too thick, no worries! Simply add a splash of chicken broth or water while stirring gently over low heat until you reach your desired consistency. This will keep the creaminess but make it easy to dollop onto your sliders.
Are there any dietary considerations for this recipe?
Very! If you’re serving guests with dietary restrictions, consider using gluten-free slider buns for a gluten-free option. Additionally, you can swap heavy cream with coconut cream for a dairy-free version. Check for any allergies with your guests if using specific spices or cheeses!
Can I prepare the filling ahead of time?
Absolutely! You can make the creamy chicken mixture in advance, letting it chill in the refrigerator for up to a day before assembling. Simply warm it up before placing it on the slider buns for a quick weeknight dinner!

Savory Creamy Chicken Fajita Sliders That Steal the Show
Equipment
- large skillet
Ingredients
For the Chicken Mixture
- 1 pound Chicken strips tender chicken
- 1 tablespoon Olive oil for cooking
- 1 teaspoon Salt to enhance flavor
- 1 teaspoon Pepper for gentle kick
- 1 teaspoon Chili powder adds classic fajita spice
- 1 teaspoon Cumin for warmth
For the Veggies
- 1 cup Sliced onions adds sweetness
- 1 cup Sliced bell peppers for color and crunch
- 2 cloves Minced garlic brings aromatic depth
For the Creamy Sauce
- 1 cup Heavy cream makes the sauce smooth
- 1 cup Shredded cheddar cheese melts beautifully
For Assembly
- 12 mini buns Slider buns holds the filling
- to taste Fresh cilantro for garnish
Instructions
Step‑by‑Step Instructions
- Heat a large skillet over medium-high heat and add 1 tablespoon of olive oil. Season 1 pound of chicken strips with 1 teaspoon each of salt, pepper, chili powder, and cumin. Add the chicken to the skillet and cook for 5-7 minutes, stirring occasionally, until golden brown and cooked through. Once done, remove the chicken from the skillet and set it aside on a plate.
- In the same skillet, add 1 cup of sliced onions and 1 cup of sliced bell peppers. Sauté these over medium heat for about 4-5 minutes, stirring frequently, until they start to soften and develop a slight caramelization. Add 2 cloves of minced garlic and cook for an additional minute, just until fragrant.
- Lower the heat to a gentle simmer and pour in 1 cup of heavy cream, stirring to combine all the flavors. Let the cream warm through for about 2 minutes, then fold in 1 cup of shredded cheddar cheese. Continue stirring until the cheese melts completely and the sauce becomes smooth.
- Return the cooked chicken strips to the skillet, mixing them well with the creamy sauce and sautéed vegetables. Allow this mix to cook together for an additional 2-3 minutes until heated through.
- Take 12 slider buns and place a spoonful of the chicken mixture on the bottom half of each bun. Top with the other half of the bun.
- Garnish the sliders with freshly chopped cilantro and serve warm.


Leave a Reply